CASSETTE TRANSFER TIPS
By Jack Endino, ©2009
I should have written this a LONG time ago. This is aimed at the "taping and trading" community and all the engineers and producers and self-styled mastering engineers out there. Too many do not know how to extract the best quality audio from a cassette. It's super-simple but this knowledge seems hidden for some reason. Recently a band who shall remain nameless issued an archival CD with some bonus live material sourced from cassette. It took me about ten seconds of listening to notice there was a problem with the transfer on a couple of tunes, and I'm annoyed that no one caught it including a well-known mastering engineer.
Here are the two things to watch out for when using cassettes as source material:
1) Head azimuth mis-alignment. This means, "the playback head should be lined up properly with the tape itself, or you're hosed."
2) Speed inaccuracies.
How do you tell if there's an azimuth problem while playing a cassette? Easy. Hit the mono switch on your stereo. [Ha ha. Yes, I know. I still have a "stereo"...] If the cymbals and high frequencies go away or it sounds all phase-ey and weird, you have a problem. Do NOT transfer or copy that cassette yet. Fixing this is easy, but you need to understand the why of it first. (And if you don't have a mono switch available to you for playback... you need to get one, or rig one, no matter what it takes. Suggestion: make a special headphone extension cable that has the left and right wires shorted together. This might blow up your stereo, but maybe not.)
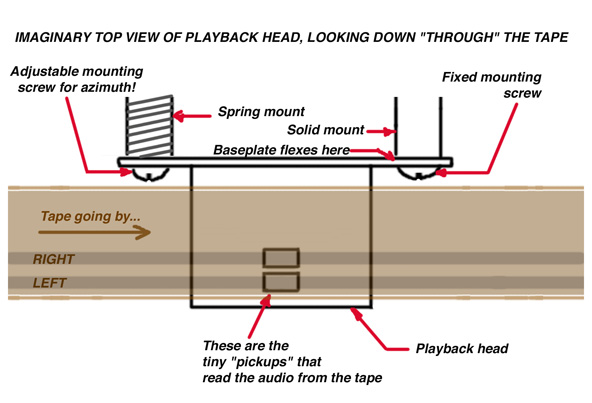
Most cassette decks have two heads: an erase head, which doesn't concern us here, and a record/playback head. I'm just going to call it a playback head for now. Cassettes contain thin tape that is 1/8 inch wide. The music is recorded onto the tape in two parallel stripes, for left and right channels. The two stripes take up one half the width of the tape; this is so you can 'flip the cassette over' and record the 2 stripes again on the other half of the tape. (Note: other HALF, not other SIDE.) So, technically there are four tracks on a cassette tape: side A, left-right, is one half the tape width, side B (with the tape running the other direction) is the other half. The playback head looks like it's the full width of the tape, but it has two tiny magnetic pickups in it that only take up half its width. These pickups, like tiny guitar pickups, are under only one half of the tape, positioned so that they line up with the two recorded stripes there. They "read" the music off the tape. You flip the tape over, tape goes the other direction, and now the other two stripes are over these "pickups", and side B plays.
The problem arises when a playback head is not aligned exactly with those magnetic stripes going by. The result is that a cassette that sounds fine on one cassette deck may sound muffled or otherwise weird on another one. You've all heard this. A cassette often sounds the best played back on the same deck it was recorded on. Put it in a different deck, and the tape and the head may no longer line up as well.
Why? Cassette decks were super-cheap consumer products full of tiny moving parts. After a couple years of wear and tear, the alignments of those parts drift. The manufacturing tolerances were never that good to begin with, and then these parts wear down, expand and contract, or shift slightly with age or just being banged around over the years. This mis-alignment problem between different cassette decks is not just common, it's UNIVERSAL. Expect it.
ADJUSTING AZIMUTH FOR A PARTICULAR TAPE
This is very difficult with a boombox-type cassette deck, but you have no business making important transfers off archival cassettes with a boom box.
You need a typical front-loading, free-standing cassette deck, where the door opens out at a slant, you slip the cassette in more or less vertically, and push the door closed. Nakamichis are good. (By the way, clean the heads and rollers with alcohol and a Q-tip before you do this, just to remove another possible variable.) The playback head is usually at the bottom center. Look down and you'll see it. The diagram I've made shows such a view of the playback head "from above". When you drop the tape in and hit "play," the head moves up about a quarter-inch and pokes into the cassette shell, making contact with the tape.
See if you can figure out how to remove the front cover on the "door". Most of them are designed to be removed easily so a tech can get at the playback head while a cassette is actually playing. Sometimes it's a couple screws but usually the cover just snaps into place, and will slide up and out with a good tug. You may have to monkey with it to figure this out, there may be hidden tabs to press, etc. If you break it, don't come crying to me. Once you get the outer cover to come off, you should see the playback head clearly in front of you, beneath the tape. The erase head will be to the left: a smaller head, sometimes black in color. To the right will be the rubber pinch roller and the capstan, the tiny rod that turns and pulls the tape past the heads.
Examine the playback head, in the center. You should see that it is mounted with two screws, one on each side. The one on the right has a solid post under it, and should be screwed tight. But the one on the left might have a spring under it, allowing it to be turned in and out a bit. This is the "azimuth adjustment screw". If you turn it with a tiny screwdriver, the head will move in and out, toward you and away from you. And actually, since the screw on the right is not moving, the head actually flexes on its backplate next to that screw ever so slightly as it moves in and out... so really, only the left side of the head, as you look at it, is moving in and out. That means the head is also twisting at a very slight angle to the tape. This is key.
Often, you will see what looks like a chunk of colored clear glue dabbed onto that left screw. They put that on there at the factory to hold the azimuth screw in place after the initial adjustment was made, before the new cassette deck was shipped to the dealer. Ignore it... chip it off with the screwdriver, or just break it loose when you turn the screw. You are trying to transfer a tape here... it's that tape you have in front of you that matters in this case, not the original factory alignment. You have to adjust the machine for THIS tape, right now.


These diagrams show what happens it the azimuth is wrong. Not only does the tape not pass exactly over the pickups, which in itself causes massive loss of high frequencies (and some overall volume loss), but the pickups themselves are not perpendicular to the tape. Note the slight angle. It means one channel is delayed slightly. That's a tiny difference, but the distance involved is often longer than a wavelength of the high frequencies on the tape! Result: when you listen in mono, the high frequencies cancel out or sound "phase-ey." (Techical term: "comb-filtering.")
To fix it so a given tape plays back at its best, put the tape in, find a passage on it with a lot of cymbals or other high-frequency content, and switch your playback system to "mono". Headphones are crucial here. While the tape is playing, reach in carefully with a tiny screwdriver, and adjust that LEFT screw (the one with the spring) on the playback head in and out, maybe half a turn back and forth, and listen to what it does to the sound. The correct adjustment is when you hear the most bright, crisp signal. You'll see that if you turn the screw away from that point in either direction, the sound gets duller and more phase-ey sounding. This is not subtle at all; the correct setting will be extremely obvious. Then switch it back to stereo. You have now gotten it to sound as good as it's going to.
If you are listening in stereo, NOT mono, you won't be able to get it exact enough. Without the two channels combining and making that phase-canceling sound, you won't be able to hear what's going on. You might get it in the ball park, but the improvement when adjusting it while listening in mono is DRAMATIC.
I can't stress enough how easy this is.
WHAT IF IT'S TOO LATE?
What if someone gives you digital files that were transferred from a cassette, and you listen in mono and there's that unmistakable phase-ey sound? If you don't have the original cassette, can you fix it?
Somewhat, yes. You can fix the delay part of it, and compensate for the rest with EQ. Assuming you have access to some digital audio program that allows you to view the waveforms up close, load the files into your program, and zoom in with as much detail as you can. You will see that one side is slightly behind the other. It may be just three or four samples, or a lot more. Four samples may not sound like much, but it's easy to hear when you hit the "mono" switch. Figure out a way to nudge one channel, a sample at a time, until it lines up visually with the other channel. Listen in "mono," and the improvement will be obvious. Now you've canceled the "delay" effect of the azimuth ANGLE being wrong, with the head being slightly twisted when the tape was transferred to digital. Add some high end EQ, and you can compensate a bit for the rest of the effect of the misalignment, although you will increase the tape hiss a lot, which can't be helped. Select/export/bounce/render the new file, and you're done.
SPEED ADJUSTMENT (WARNING: HIGH VOLTAGES PRESENT!)
WARNING: you can't do what I'm about to describe without taking the top cover off your cassette deck and exposing the innards, and then mucking around inside it WHILE THE POWER IS ON. THE POWER SUPPLY FOR THE DECK WILL BE EXPOSED. THE AC LINE VOLTAGE CAN KILL YOU. YOU SHOULD HAVE A QUALIFIED TECHNICIAN DO THIS FOR YOU. THE FOLLOWING IS FOR EDUCATIONAL PURPOSES ONLY.
Cassette decks are terrible about speed accuracy. This drove me crazy for years. Their speed changes with time and wear. Often there will be a 2 or 3 percent speed difference between different cassette decks, or between a deck when new and that SAME deck a year later. Three percent may not sound like much, but remember that six percent equals a half-step or semitone... that's the next fret on a guitar, or the next piano key. So, one percent (one-SIXTH of a half-step) is a pretty big difference in pitch and speed, and is very easy to hear and feel.
Cassette decks mostly have little 12 volt DC motors in them. Sometimes one motor does the job of turning everything: capstan, take-up reel spindle, rewind/fast forward, etc. On better decks, there is a motor for the capstan, and a separate motor for everything else. We are concerned here with whatever motor controls the capstan and thus the tape speed. The motor itself usually has a tiny hole somewhere in back of it, usually with a tiny rubber flap to seal out dust. Inside that hole will often be a very tiny adjustment pot with a little slot in it for a tiny screwdriver. If you reach into that hole with the screwdriver, you will find the slot, and if you turn it while playing a tape, you will hear the tape speed go up and down. (If you touch the shaft of the screwdriver against the side of the hole, you may hear wild speed fluctuations, because you are shorting the adjustment pot to ground. My screwdriver is wrapped with a little piece of tape to avoid this.) You won't hurt the motor by doing this, so don't be afraid of it. BUT... be really careful not to touch anything else inside the deck, as you can electrocute yourself! You will be extremely dead! DISCLAIMER: THERE ARE VOLTAGES NEARBY THAT CAN KILL YOU! PROCEED AT YOUR OWN RISK! HAVE A QUALIFIED TECHNICIAN DO THIS FOR YOU! THIS IS FOR EDUCATIONAL PURPOSES ONLY!
How do you know when the deck is at the right speed? You need a reference. I spent 60 bucks on a "Cassette Speed Reference Tape" which has test tones on it, at exact known freqencies. (Google "Magnetic Reference Laboratories.") Then I spent 250 bucks on a "Frequency Counter." (Google "Full Compass Systems" or "Sweetwater Sound." Then try "Loftech TS-1.") You feed a pure tone into it, and it gives you a numerical readout of the frequency. You put the test tape in the deck, connect a guitar cable from the cassette deck's headphone output into the frequency counter, use the tiny screwdriver in the adjustment hole on the back of the little DC motor, and adjust it while the test tape plays until the counter reads correctly.
Here's a question: how can you get the tape speed of a playback deck to be the same as the deck that recorded the tape you're trying to play? To make your transfer as perfect as possible, you want the speed of the playback deck to match the speed of the deck the tape was recorded on, just like how you matched the head azimuth. Unfortunately, unlike with azimuth, with speed you can't tell exactly. If you know a song is in a particular musical key, you can play guitar or piano along with the tape and adjust the speed by ear until the tuning sounds right... except that often, the tuning on the tape is not what you think it is. (Read my guitar tuning article, and weep.) Guitars may be slightly sharp, in which case you may inadvertently make the tape run too slow. (Etc.) My philosophy is, getting the playback deck back to the standard, correct playback speed is MOST LIKELY to make MOST tapes play back the best, on average, and that's the best you can do! It's also the only way of making sure tapes you record on THAT machine will play back correctly in the future on the largest number of other machines. There are always TWO variables here: the speed of the playback deck in front of you, and the speed of whatever deck RECORDED the tape you're now playing back. But you can only correct ONE of these variables, the deck in front of you, so you might as well just do it... remove one of the variables.
(I can imagine one other thing that I haven't tried. If you could detect any 60 cycle hum that was recorded on the tape along with the music, maybe guitar buzz before a song, you might be able to use that as a reference. Buzz and hum is usually a mix of 60 Hz and its harmonics like 120 Hz, 180 Hz, 240 Hz, etc.... unless the music was from Europe, where line frequency is 50 Hz... oh, heck, never mind.)
Since you don't want to spend all that money, I'll tell you the "guerrilla" method of doing this that I figured out when I was 16. I tried two assumptions: that a cassette deck when NEW was probably running at the right speed, and that a pre-recorded commercial tape of any popular album was also probably manufactured at the right speed. I happened to have an "A 440 Hz" tuning fork. When I bought a new cassette deck, I recorded the A 440 tuning fork onto a cassette by holding the fork close to my guitar pickup, with the guitar plugged right into the input of the tape deck. Then I would put the cassette into any other deck I wanted to align, and play the recorded tuning fork back thru headphones on my head. I whacked the tuning fork and held the base of it against the outside of the headphones, so I could hear it along with the recorded tuning fork... and it was really easy to hear the "beating" sound when the speed was off, and adjust until the beating sound went away. I was pretty pleased with myself. Now I had two cassette decks running at the same speed. Since I was learning how to record "multitrack" by bouncing signals from one cassette deck to another with a "y" cable, having them both at the same speed was great.
To check if my new "speed reference test tape" really was correct, I used a "store-bought" Led Zeppelin cassette, and a vinyl copy of the same Zep record. My turntable (a Technics SL-23) had a super-obvious speed adjustment: it had those dots around the outside of the turntable platter, and a little orange neon strobe light, so you could get the speed of the turntable exactly right. The trick is to cue the record and the cassette deck up to the same point in the music, and start them at the same instant, and listen to see if they stay in sync for more than a few seconds. It would always take a few tries before I got lucky syncing the starting point, but it worked to show me if the cassette was running at the right speed. In case the store-bought cassette's manufacturing speed wasn't accurate, I tried it with a couple other pre-recorded cassettes and vinyl records, and the results were consistent, so I knew my "A 440 tuning fork" test cassette was right. I used that home-made test cassette and the "A" tuning fork successfully for years, until I finally sprung for the 'professional' tape and gear.
Now you know what kind of a geek I already was, at age 16. Or was it 14?
GETTING THE AZIMUTH BACK TO "FACTORY SETTING"
Pre-recorded "commercial" cassettes have another use: their azimuth is usually pretty good, on average. Suppose you want to record some cassettes, so you can listen to new records in your old Buick that only has a cassette deck in it, like mine. To get your cassette deck (that you've just been screwing with) back to some kind of "standard" azimuth setting after you're done transferring some wacko-aligned tape, go to Goodwill, Salvation Army or some other second-hand store and pick up a couple of Eagles and Fleetwood Mac cassettes for 25 cents. Actually, something like Metallica or Slayer that has lots of cymbals and high frequencies will work even better. Strike an average between the best azimuth settings for several of these commercial cassettes, and you will be as close to your original "from-the-factory" azimuth setting on your cassette deck as you will ever need to be.
Happy taping!
'Till next time,
Jack
©1997-2013 Endino